Home : Product Search : Site Map : Checkout : Track Your Order : Login : Customer : Price Set : Wish List :
Search by Keyword
Product Categories
Site Map
 If you are allergic to cigarette smoke, you need not worry about one of our dresses smelling like cigarette smoke
|

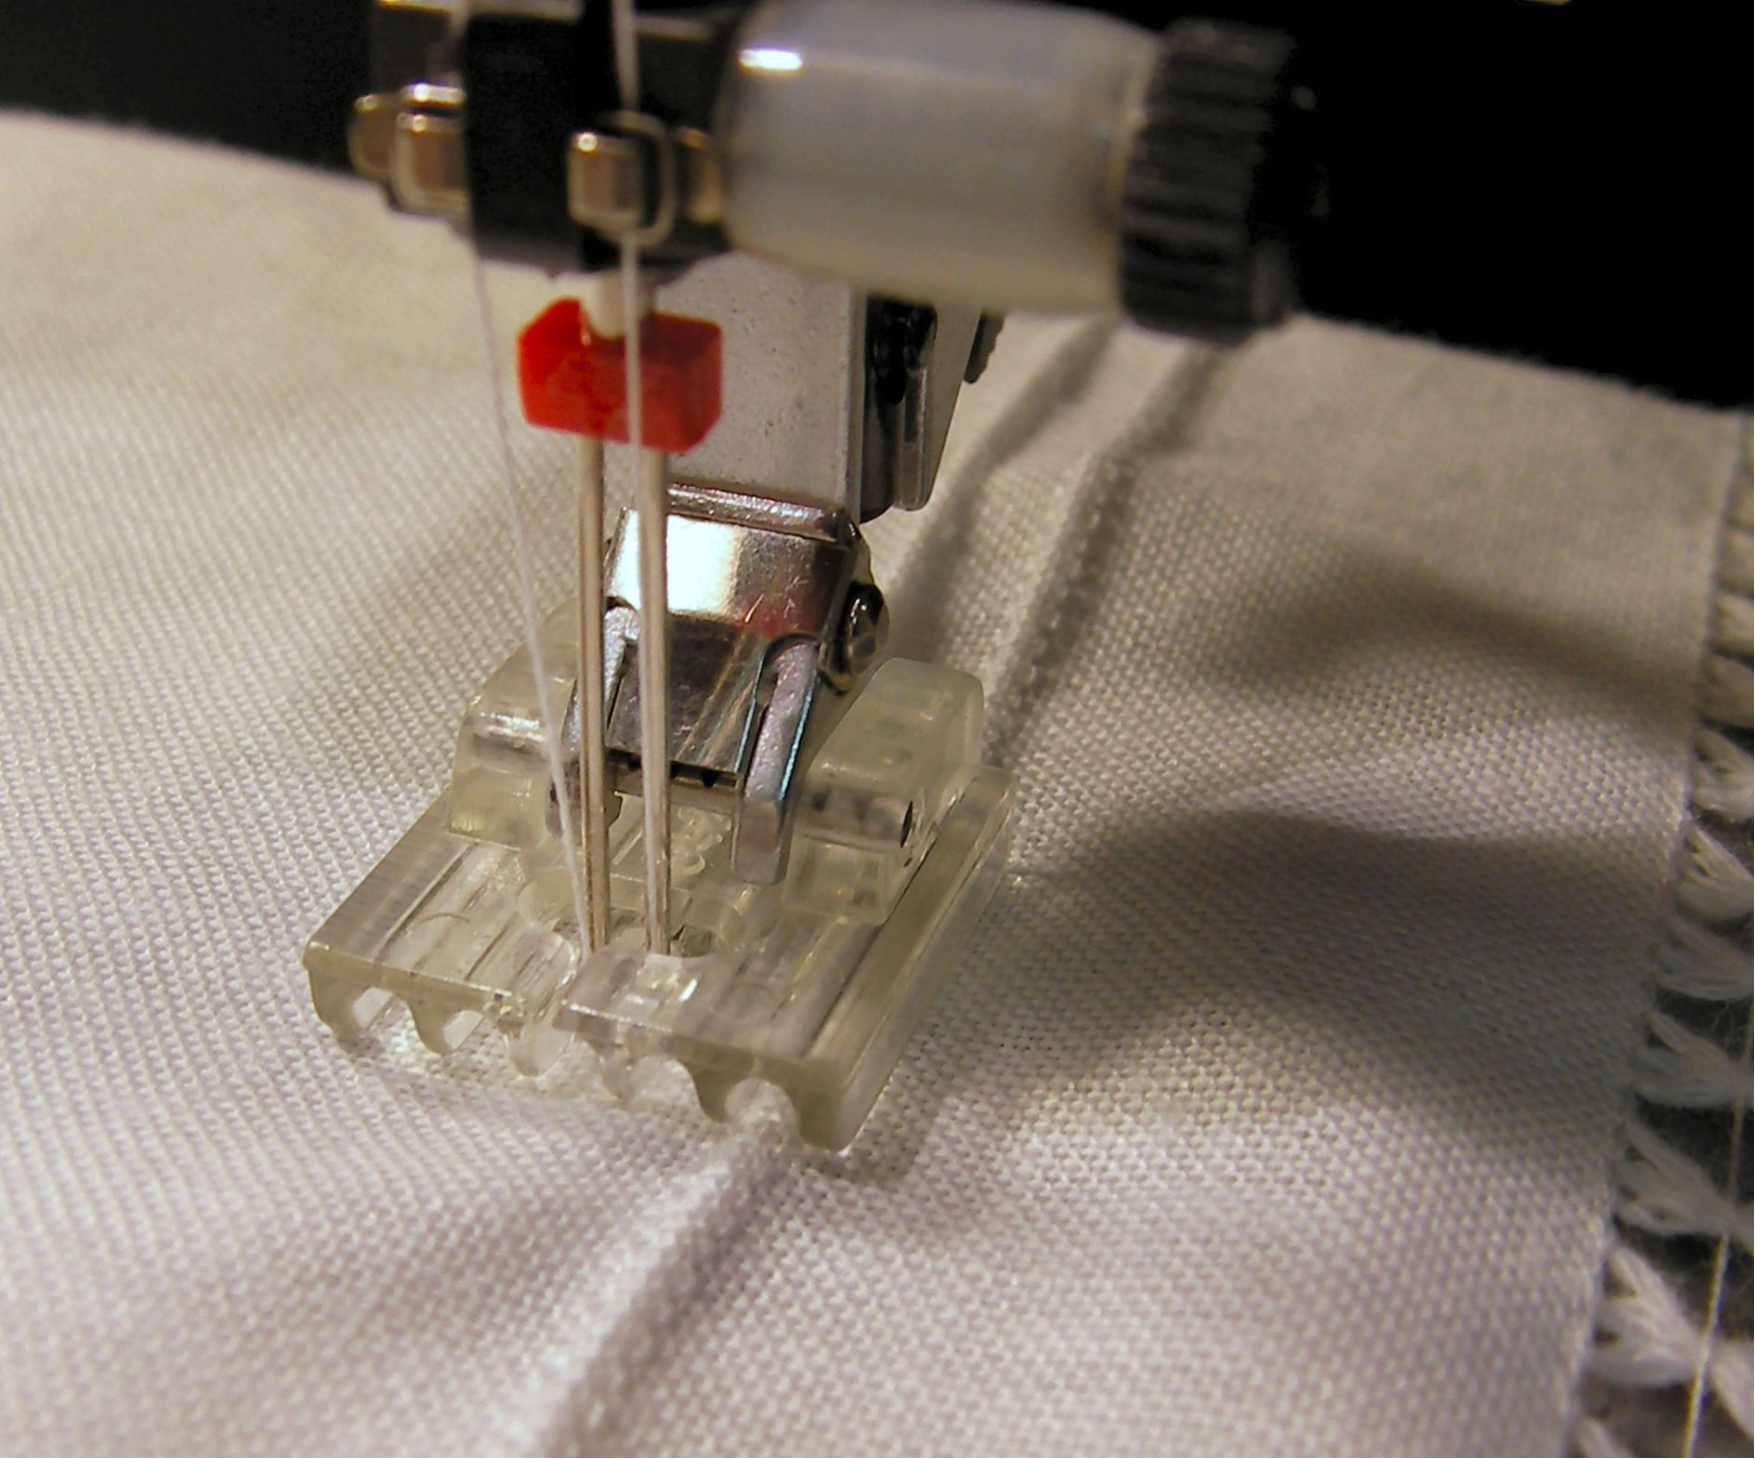
The twin needles
 The Needle: A twin needle - the size of the needle should match the fabric, the distance between the needles should closely match the size of the cord. Double or twin needles come in several sizes, for example in 1.6/70 the first number refers to the millimeter distance between the needles and the second is the size of the needles. Another common size is 2.0/80, 2.5/80 is also used. Note that the twin needles are attached to each other by a plastic bar. This bar is usually not very strong and will break if care is not taking when pulling the fabric or removing it from the needles area at the end of a pintuck.
|
Positioning of the Pintucks
 Most people draw a line on the fabric to mark where the corded pintucks are to be placed. This marking is done using a water soluble pen, vanishing pen, washable pencil, or pencil. At Bumba Bella we use the ‘pulled thread’ method as we consider this method more precise.
Pulling a thread: Thread-pulling is a way to make sure the pintuck is not only positioned straight but it will be with straight grain. Simply pull a thread all the way across or down so that you have a straight line along the grain by which to sew. Pull a thread to align the first pintuck. When doing pintucking on a larger flat piece of fabric, such as the front yoke or the sleeves of a Christening gown that will be cut into smaller pieces later, allow the pintuck foot to act as the guide. For example the front yoke of a Christening gown may be initially cut as a rectangle larger than the pattern size to allow for the pintucks, lace, and embroidery to take up fabric. Mark the pattern on this rectangle, once the embellishment is finished, and stay-stitched just inside the cutting line, cut out the yoke pattern
When making multiple rows of pintucks, we pull a thread to mark the center pintuck, and then we sew some of the pintucks to one side and some on the other side of the central pintuck. For example when doing a set of six (6) pintucks in rows, pull a thread to mark the position of the third pintuck. Sew this pintuck and then sew two (2) pintucks on one side of this one and three (3) pintucks on the other side. Bumba Bella uses this method when doing, for example, pintucks along the hem of the skirt of a Christening gown. Please note that pintucks sewn along the grain, such as those done in the bodice, will have a slightly different look than those sewn across the grain such as those around the hem of a skirt of a Christening gown.
|
The pintuck feet
 The pintucking foot comes in different types/sizes. The pintucking foot allows the cording to pass under the foot.
We have a three (3) groove, five (5) groove, seven (7) groove, and nine (9) groove, with the three (3) groove foot making the biggest tucks and the nine (9) groove foot used for the finest. The five (5) groove foot is our favorite, followed by the seven (7) groove foot. The fabrics we prefer, usually Swiss Batiste, for heirloom sewing are more suitable to these two (2) feet types.
|
The thread
 When doing corded pintucks, use only cotton embroidery thread such as Mettler® 60/2 or DMC® 50/2 depending on the fabric. The first number in the designation of the thread refers to the weight or size, the larger the number, the finer the thread. The second number refers to the number of plies which are twisted together. These cotton embroidery threads are made of long fiber Egyptian cotton which results in less snagging, knotting, and breaking. These cotton threads are twist balanced to eliminate tangling and knotting and do not shrink, which prevents puckering after washing and pressing the Christening Gown.
For Swiss batiste we recommend the cotton embroidery 60/2 thread. Use 60/2 cotton embroidery threads for rolling and whipping but do not use them for construction as these threads are not strong enough for seams. Use 60/2 cotton embroidery thread to thread the twin needles. We use 40/2 cotton thread as the bobbin thread. The use of cotton embroidery thread is preferred when the shine of the rayon embroidery thread is not desired in the heirloom sewing technique. A lighter weight thread will give a tighter pintuck and a more delicate look to the pintucks. When using rayon embroidery thread, 40 wt, the untwisting of the left side twin needle may cause tangling, breaking, and nasty knots. After each line of pintuck, you may have to rethread the sewing machine and you may need to stop and fix the work after each thread failure. For this reason we do not recommend using this thread for pintucks.
|
Threading the sewing machine
 Most machines can accommodate two (2) spools of thread. Thread the machine as usual, using the same type of thread in each twin needle, except most machines work best if you route one thread on each side of the tension discs. When threading the machine for sewing pintucks, the first thread is threaded normally, going behind in some sewing machines models or to one side of the thread tension plate/disc, and then threading as you normally would, with this thread going into the left needle. The second thread goes in front on some models and to right in some other models, continued through all the normal threading. Some have said that not putting the left side needle thread in the last thread guide clip that is above the needle works well and minimizes the tendency for that thread to untwist. Go straight down from threading arm into the left side needle. It is important that the thread feed off of the spool evenly and smoothly. Any catches no matter how small, will affect thread tension and result in uneven stitches and sometimes even thread breaking.
|
The cording
 In addition to helping to avoid puckering, the corded pintucks give the garment more texture. Corded pintucking is achieved by placing cotton yarn or thread below the cloth in the center of the pintuck. Corded pintucks are more prominent or pronounce than pintucks lacking cord. Corded pintucks will not go as flat when the gown is ironed. One possibility for cording pintucks is to use Finca® or DMC® perle cotton. The most common sizes of these perle cotton threads are 8, 12, and 16, depending on the size of the pintucks. Perle threads come in a variety of colors, allowing you to achieve a pretty shadow-work look. Gimp is another possibility for cording the pintucks. Gimp is a coarse thread, usually glazed, used not only in lace making but to outline designs such as the pintucks. However, the Perle cotton threads are more readily available than gimp. Some sewing machines have a small hole in the needle plate to allow you to feed the cord into the pintucks more easily.
|
Sewing the pintucks
 First, be certain that the sewing machine is threaded correctly and clean. Use a twin needle, put on the pintuck foot, thread the cord through the hole in the needle plate, and set the machine for a 1.5 or a 2.0 stitch length. Test that the cord fits between the twin needles that you are using. You shouldn't have to change the thread tension nor the bobbin tension. Use normal tension, or loosen the top tension slightly. Be certain your needle is set in the normal, middle position. And that both needles clear the foot and plate. Be careful because hitting the plate or foot will break the needles. Practice on sample of the same fabric until achieving the desired look. Place the cord under the fabric and line the cord up so it will go between the needles. The bobbin thread encloses the cording and pulls some of the top thread to the back.
As the bobbin thread goes between the two (2) top threads, the machine will automatically pull the fabric together, causing the pintuck to form.
|
The first pintuck
 We do this first pintuck using the lace guide foot to achieve greater precision. The use of this foot will give a flatter pintuck. To compensate for this effect increase the top tension a little bit, although it is not really needed.
|
Sewing the first pintuck
 Top stitch the first pintuck following the marked line or pulled thread.
|
The second pintuck
 Some seamstress prefer to lined up each new pintuck 3/8" from the one just sewed by moving the twin needle position. This procedure of changing the position of the twin needle does not always work because the new position may not match exactly into the foot grooves diminishing the quality of the work. Also many recommend that you turn the fabric and sew in opposite directions for each pintuck. This technique may work when doing corded pintucks on small pieces of fabric, however, when working with larger pieces, for instance the bottom of the skirt of a Christening Gown, we recommend keeping most of the gown to the left of the needles as the sewing machine usually does not have enough room to accommodate the entire gown to the right side.
One last thing, to ensure a pretty pintuck sew at a moderate steady pace. The speed is such that to do one (1) pintuck of approximately 2.4 yards in length the time we spend is approximately 10-12 minutes with the machine making 2 to 4 stitches per second.
|
Shopping Basket
| Items: | 0 |
| Subtotal: | $0.00 |
Note: All prices in US Dollars
Specials
Your Pictures Wanted
If you submit a satisfactory picture
of your child wearing an item sold
by Bumba Bella and allow us to use
the picture on our web site, we will
give you a REFUND of 25% credited
on the credit card you used to
purchase the item.
CLICK HERE FOR UPLOAD FORM
of your child wearing an item sold
by Bumba Bella and allow us to use
the picture on our web site, we will
give you a REFUND of 25% credited
on the credit card you used to
purchase the item.
CLICK HERE FOR UPLOAD FORM