Home : Product Search : Site Map : Checkout : Track Your Order : Login : Customer : Price Set : Wish List :
Search by Keyword
Product Categories
Site Map
 If you are allergic to cigarette smoke, you need not worry about one of our dresses smelling like cigarette smoke
|


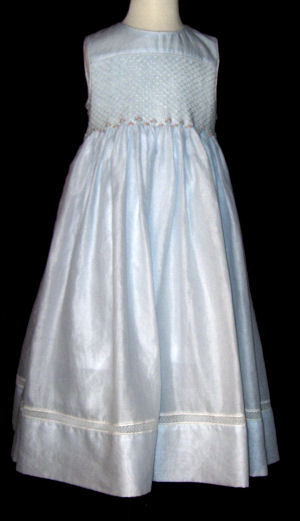
For the dress we used 100 % cotton dust blue Spechler Voguel nelona and for the liner 100 % cotton light blue Spechler Voguel Pima. This smocked dress consists of a front skirt, one (1) back skirt for the dress and one (1) back skirt for the liner, one (1) front yoke and one (1) for the liner. Two (2) back bodice pieces have been cut on fold so that half of each is the back bodice and half is the liner. A placket, bias strips for piping and a hem band were also cut. To prepare for pleating we use a piece of white French fuse (the length of the skirt) approximately 17 3/4" wide (for this example). The width of this interface will change according to the smocking pattern selected. Place the interface to the wrong side of the front skirt of the dress. Interface the front skirt by matching the side and upper raw edges of the French fuse interface and the front skirt. Fuse the interface. You may want to use a piece of self-fabric instead of the French interface.
 Baste pleater guides by sewing seams the same length as the pleated. In this case 17 3/4". Using a contrasting color thread sew in the center of the front skirt, make another seam at the fourths, and eights of the width, as shown. In this picture the fabric is folded in half. The seams will be used as guides so that the pleating is done straight. As each section of the front skirt goes through the pleater watch for the guides and correct as needed. |
 To thread the pleater, we used hand sewing quilting thread in two (2) contrasting thread colors, orange and blue. We cut these threads the same length as the fabric to be pleated. In this example the threads are cut at a length of 55". We threaded the pleater so that the two (2) thread colors alternated. We used the half needles also. In this example we used a total of 30 needles, 26 of these are used in the smocking. Two (2) needles, at the top and two (2) needles at the bottom are used as holding rows. |
|
This picture is taken from the output side of the pleater. Most of the fabric is rolled up on the input side. Place the upper raw edge of the front skirt to the left of the pleater, as seen from the input side, so that most of the skirt is out of the pleater. Place the wrong side of the skirt up as shown. Have your helper start turning the rollers slowly as you feed in the fabric. Feed the raw edge at exactly the same pleater groove. Keep the same tension all across the cloth being fed to the rollers. This helps keep straight pleats. Correct the tension using the basted guides. |
 When the front skirt has been pleated remove the threads from the needles to release the pleated fabric. |
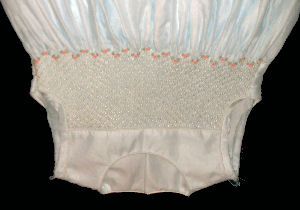
 Select the threads to use for the smocking. In this example we used Anchor Marlit stranded rayon in color 1212 ecru for the background. We used Anchor Marlit stranded rayon colors 1019 baby pink, 1213 light baby pink, and DMC stranded rayon color 30504 light blue-green for the roses and vine at the bottom of the yoke. Execute the background pattern. |
 In this example we back-smocked the last two (2) full rows following the outline of the peaks smocked at the front of the skirt. |
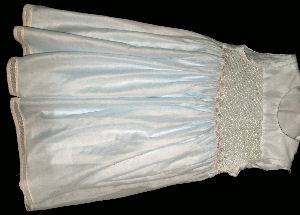
 After smocking the background rows, block the front skirt. Remove the holding threads at the bottom of the smocked area and the threads in the last two (2) smocked rows separate the interface from the fabric by pulling up the interface layer. Cut the excess interface very close to the back-smock making sure not to trim the back-smock thread. Double check the blocking size and remove the remaining pleating threads except for the two (2) at the upper side of the skirt to prepare for the embroidery of the roses at the bottom of the yoke. |
 The back bodice is to be reinforced using French fuse (or any other light weight interface). Place the wrong sides of each of the back bodice pieces together and matching the raw edges, fold and press each of the back bodice pieces to determine the folding lines. Fuse the interface (French fuse) to the wrong and opposite sides of the back bodice. Make sure to cut two (2) back bodice pieces, one (1) for each back side and interface them on opposite sides. The interfaced area is to be used as liner. |
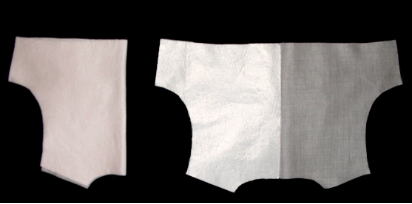 The back bodice is to be reinforced using French fuse. Place the wrong sides of each back bodice piece together and matching the raw edges, fold and press each of the back bodice pieces to determine the folding lines. Fuse the French fuse to the wrong and opposite sides of the back bodice. |
|
Make piping for the front bodice, the neckline, the back bodices (2), and armholes (2). When making piping, we cut the fabric on the bias. Interface the bias band and use 100% white cord that has been washed to prevent shrinkage. Stitch the shoulder seams both for the dress and the liner. Measure the neckline and cut a piece of piping that is one (1) inch longer than the neckline. The extra inch in length is for seam allowance (half inch on each end). Pin the piping around the neckline of the dress on the right side of the fabric, curving the ends up into the seam allowance at the back opening edges. Place the front bodice of the dress and front bodice of the liner together matching the right sides and the necklines so that the piping is sandwiched between the dress and the liner. Stitch along the piping stitch line. Clip the neckline at about 3/8" intervals. |
 Top stitch around the armhole pattern of the smocked front skirt and cut the corresponding armholes. Pipe the front smocked skirt and attach it to the front bodice. Pin the piping to the dress armhole and stitch. Place the liner over the dress fabric so that the armhole piping is sandwiched between the dress fabric and the liner. On the wrong side of the fabric, clip the armholes at about 3/8" intervals. Gather the front liner skirt and attach it to the front liner bodice. At the center of the back skirts (dress and liner) construct the placket. Place the piping to the lower edge of each of the back bodice pieces, curving the piping up into the seam allowance at the fold line (back center line). Gather the back-dress-skirt and the back-liner-skirt and attach them to the back bodices, dress and liner respectively. The liner back skirt is not to be piped. |
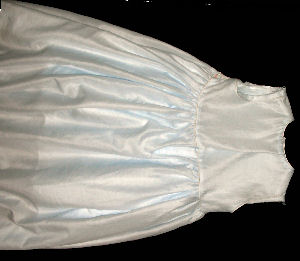 With the wrong side of the fabric together pin and stitch the front to the back at the sides of the dress and liner separately making sure that the piping around the armhole of the dress matches. Press the side seams. We use the un-threaded serger to trim the seam to 3/16 inch (use the scissors if preferred). Pin the side seams with the right sides of the fabric together, on the seamline, (keeping the dress fabric and the liner separately), straight stitch again enclosing the raw edges in the seams, press towards the back. |
 Measure two (2) lengths of entredeux and one (1) length of lace. The entredeux is to be attached to each side of the lace. Trim the batiste heading away from one side of the entredeux, making sure not to cut the stitching. With the entredeux and lace right sides up place the trimmed edge of the entredeux edge just touching the edge of the lace. Adjust the width of the zigzag stitch so that one side of zigzag goes over the lace heading and the other side going into the holes of the entredeux. Adjust the length of the zigzag stitch so that each zigzag stitch goes into each hole of the entredeux. Make adjustments as necessary as the stitching progresses. Press the zigzag seam. This finished lace entredeux band will have the lace between two (2) bands of entredeux. The entredeux still has one side of the batiste on the outer edge of the band. |
 To attach the lace-entredeux-lace band to the lower edge of the skirt do the following: With right sides together, match the raw edges, pin and stitch the two (2) short ends of the entredeux-lace-entredeux band together to form a circle. This circle should be the same length as the length of the lower edge of the dress skirt. With the right side of the entredeux-lace-entredeux band batiste over the right side of the lower edge skirt fabric, match the raw edges and stitch the band to the skirt using a short stitch. Trim the seam to approximately 1/8 inch using an un-threaded serger or scissors. Roll and whip the fabric edge using a zigzag stitch such that the stitch just zigs into the entredeux and zags completely over the fabric edge to roll this edge. Press the seam toward the fabric. |
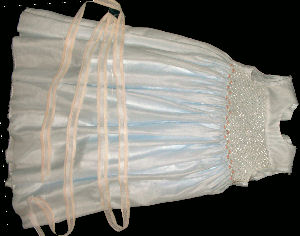
 The hem band in this example is made by cutting two (2) pieces of dust blue nelona fabric 8 inch wide. The lengths of the pieces match the length of the skirt. To do the French side seams, put wrong sides together and match the raw edges. Pin and stitch the short ends of the two (2) hem band pieces at the sides and press. Trim the side seam to approximately 3/16 inch using an un-threaded serger (or use scissors if preferred). Stitch again using a short straight stitch to finish the French side seam and press the side seams. With the wrong sides together, press the hem band so that the raw edges match. To attach the skirt to the hem band do the following: With the right side of the remaining entredeux batiste over the right side of the lower edge skirt fabric and matching the raw edges, stitch the band to the skirt using a short stitch. Trim the seam to approximately 1/8 inch using an un-threaded serger or scissors. Roll and whip the fabric edge using a zigzag stitch of appropriate width. Press the seam toward the fabric. |
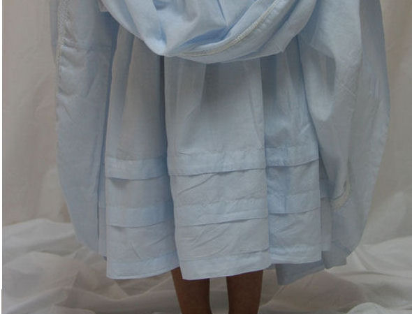 The liner is one (1) inch shorter than the length of the dress. This example shows two (2) optional tacks in the lower part of the liner skirt. Each of the tacks is one (1) inch wide. The hem of the liner is one (1) inch wide with 1/4 inch folded under on the lower edge of the skirt using straight stitch and pressed. |
 To stitch four (4) horizontal buttonholes on the right back bodice spaced equal distance apart place one (1) buttonhole close the neckline, and another close to the back bodice piping. Measure the distance between these two (2) buttonholes and divide the distance by three (3). Mark the position of the remaining buttonholes and stitch them. The button holes should be approximately 1/4 inch from the edge of the back bodice. Attach buttons on the left back side to correspond to the positions of the button holes. |
Shopping Basket
| Items: | 0 |
| Subtotal: | $0.00 |
Note: All prices in US Dollars
Specials
Your Pictures Wanted
If you submit a satisfactory picture
of your child wearing an item sold
by Bumba Bella and allow us to use
the picture on our web site, we will
give you a REFUND of 25% credited
on the credit card you used to
purchase the item.
CLICK HERE FOR UPLOAD FORM
of your child wearing an item sold
by Bumba Bella and allow us to use
the picture on our web site, we will
give you a REFUND of 25% credited
on the credit card you used to
purchase the item.
CLICK HERE FOR UPLOAD FORM