Search by Keyword
Product Categories
Site Map
 If you are allergic to cigarette smoke, you need not worry about one of our dresses smelling like cigarette smoke
|

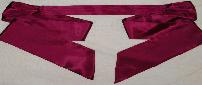
Instructions for making a cummerband
How To Make A Cummerband
This is a modified cummerbund designed to be used with a flower girl dress. This accessory, composed of a front band and a sash, is made usually in bright solid color fabric matching the fabric of the bridesmaid’s dresses. The fabric is such as shantung, dupioni silk, silk, velvet, and taffeta. The front band features five (5) tucks which are sewn and folded down. Although some descriptions of the history of the cummerbund describe it as a device for catching crumbs, these tucks are not designed to catch crumbs. The cummerbund is used to enhance the flower girl dress.
What you would need
Straight pins
Tape measure
Scissors
Iron and ironing board
1 ¼ yards of fabric
2” x 13 3/8” (6 cm x 34 cm) fusible interface
Sewing needles
Sewing machine
Sewing machine matching thread for
top stitching
pressing cloth
The Sashes
Cut two (2) rectangles, along the grain, two rectangles 12” x 41 3/8” (30 cm x 105 cm) each. With right sides together and matching the raw edges, fold each sash in half along the length and press. Starting at one of the shortest sides of the band, pin and stitch along the long raw edge, beginning with a 1 5/8 (4 cm) from the raw edges. The length of this seam is going to be half the length of the length of the sash. In other words, stitch up to the halfway point, that is, 20 6/8” (52.5 cm). At this point start a taper seam. This taper will end 3/8” (1 cm) from the raw edges and 5 ½” (14 cm) from the end side of the sash. At this point stitch diagonally across the lower end of the sash so that the seam will go to the opposite corner forming a wedge. Trim the raw edges of the seam allowance of approximately ¼” (0.5 cm) and clip the corners. Turn to the right side and press along the seam.
The Front Band
Cut a 12” x 14” (30 cm x 36 cm) rectangle. The five (5) of this front band are going to be parallel to the long edge of the rectangle, 5/8” (1.5 cm) wide and separated by ¾” (1 cm). The tucks are wider than the separation between two consecutive tucks. This method guarantees that each of the tucks cover the seam of the next tuck.
To keep the tucks straight and even, pull out threads along the grain. For five (5) tucks pull out 10 threads, five (5) of these pulled out threads determine the place of the tuck fold, the other five mark the place of the five (5) topstitched seams.
The first thread is to be pulled 3 3/8” (8.5 cm) from the raw edge. This procedure determines a rectangle which is, partially, the lining section of the front band.
The second pulled out thread is 5/8” (1.5 cm) from the first pulled out thread.
The third is 1” (2.5 cm) from the second.
The fourth is 5/8” (1.5 cm) from the third.
The fifth is 1” (2.5 cm) from the fourth.
The sixth is 5/8” (1.5 cm) from the fifth.
The seventh is 1” (2.5 cm) from the sixth.
The eighth is 5/8” (1.5 cm) from the seventh.
The ninth is 1” (2.5 cm) from the eight.
And the tenth is 5/8” (1.5 cm) from the ninth.
Pull out threads 1 and 2, 3 and 4, 5 and 6, 7 and 8, 9 and 10 are separated 5/8” (1.5 cm). Pull out threads 2 and 3, 4 and 5, 6 and 7, 8 and 9 are separated by 1” (2.5 cm).
Fold the fabric at pull out threads 1, 3, 5, 7, and 9. Topstitch at pull out threads 2, 4, 6, 8, and 10.
Fold the fabric along pulled out thread 1, pin at the fold and topstitch along pulled out thread 2.
Fold the fabric along pulled out thread 3, pin at the fold and topstitch along pulled out thread 4.
Fold the fabric along pulled out thread 5, pin at the fold and topstitch along pulled out thread 6.
Fold the fabric along pulled out thread 7, pin at the fold and topstitch along pulled out thread 8.
Fold the fabric along pulled out thread 9, pin at the fold and topstitch along pulled out thread 10.
After topstitching the five (5) tucks in place press them down. This will give a tuck area of approximately 2 3/4” (7 cm) wide.
Interfacing
Cut a 2 ½” x 13 ½” (6 cm x 34 cm) fusible interface. Fuse the interfacing to the wrong side of the lining section of the front band, matching one of the long edges of the interface with the seam of the first tuck and leaving 3/4” (1 cm) on each of the other three (3) sides. The fabric will have a seam allowance of ½” (1 cm) around three (3) sides of the interface.
Attaching the Sashes to the Front Band
At 5/8” (4 cm) from each of the short ends of the sash, fold two (2) 1 3/8” (3.5 cm) deep knife pleats into the fabric so that each finished sash measures 2” (5 cm) across, baste. Repeat for the other sash. With right sides together and matching raw edges pin and sew each of the sashes to each of the short ends of the tacked area. With right side together and matching raw edges fold the front band lining section up over the tacked area and pin in place. Sew across each of the short edges and most of the front lower edge leaving an opening of approximately 4” (10 cm) in the center of the band. Turn the seam, clip the corners, and turn to the right side, through the opening, by pulling the sashes through and press the band. Close the opening by hand stitching it using a hidden stitch and press.
Printing of these instruction for personal use to make and sell bonnets is allowed. The selling of these instructions or its inclusion in any collections for sale is prohibited. When teaching a class, the use of these instructions is allowed only when the class is taught 'free of charge'. These permissions and prohibitions include the individual pictures. (c) 2010. All rights remain with Bumba Bella Boutique.
Made-to-order custom made dresses
If you like our dresses and have something particular in mind, a different color, a different size or a special request, we will be pleased to make a hand smocked dress for you for our normal price plus any additional fully discussed costs for specialty fabrics or yarns required.
Special orders take approximately three (3) weeks.
Bumba Bella accepts rush orders to be made within seven (7) days [exclusive of shipping delays] for an additional cost of 20%.
Shopping Basket
| Items: | 0 |
| Subtotal: | $0.00 |
Specials
Your Pictures Wanted
of your child wearing an item sold
by Bumba Bella and allow us to use
the picture on our web site, we will
give you a REFUND of 25% credited
on the credit card you used to
purchase the item.
CLICK HERE FOR UPLOAD FORM